Introducing the Arduino Mega: Power for Bigger Projects
Hey makers! 👋
If you’ve outgrown the Arduino Uno or want to take your projects to the next level, the Arduino Mega is here to give you room to grow. This board is perfect for ambitious builds, with 54 digital I/O pins, 16 analog inputs, and 4 hardware serial ports. That’s way more pins and ports than the Uno, giving you the flexibility to connect lots of LEDs, motors, sensors, and displays all at once.
With the Mega, you can handle complex robotics, large LED arrays, multi-sensor systems, and even home automation projects without running out of pins or memory. It’s essentially the “big brother” of the Arduino family, designed for projects that need more connections and more processing power.
Getting started with the Mega is easy. If you’re familiar with the Arduino Uno, you’ll feel right at home—same Arduino IDE, same programming style—but with a lot more room to expand. Beginners and experienced makers alike will find it exciting to experiment with its extra pins, multiple serial ports, and larger memory.
Whether you’re planning a robot with multiple motors, a weather station with tons of sensors, or a LED display project that needs dozens of outputs, the Arduino Mega is ready for the challenge. It’s your gateway to bigger, bolder, and more ambitious Arduino projects. 🌟
Discover the Arduino Mega: Features and Functions Made Simple
Hey Arduino fans! 👋
If you’re ready to take your projects up a notch, the Arduino Mega is the perfect board to explore. Think of it as the “big brother” of the Uno, packed with extra pins, ports, and memory to handle bigger, more complex builds. Let’s break down what makes the Mega special in a way that’s easy to understand.
More Digital Pins for More Fun
The Mega has 54 digital I/O pins—that’s almost double what you get on an Uno! These pins let you connect tons of LEDs, buttons, sensors, and motors at the same time. Want to make a huge LED matrix or a multi-motor robot? The Mega’s pins have you covered.
Extra Analog Inputs
With 16 analog inputs, you can read data from multiple sensors simultaneously. Temperature, light, or motion sensors? You can hook up a bunch and read all their signals without adding extra hardware.
Multiple Serial Ports
Unlike the Uno, which has just one serial port, the Mega comes with 4 hardware serial ports. This makes it super easy to communicate with multiple devices at once—like a GPS module, Bluetooth, and a sensor board—all without juggling software serial libraries.
More Memory for Bigger Programs
The Mega has more flash memory and SRAM than the Uno, meaning you can write larger programs and store more variables. Perfect for projects with lots of LEDs, motors, or complex logic.
PWM and Communication Options
The Mega includes 15 PWM pins for smooth motor and LED control, along with I2C and SPI support for connecting displays, sensors, and other modules. That’s a lot of options to play with, whether you’re building robots, home automation systems, or interactive displays.
Beginner-Friendly Compatibility
Even with all these features, the Mega works just like other Arduino boards. The Arduino IDE, libraries, and sketches you already know will run on the Mega. It’s an easy step up from the Uno, giving you more power without a steeper learning curve.
Why Choose the Mega?
If your project needs lots of pins, multiple serial devices, or larger programs, the Mega is the board to go for. It’s perfect for ambitious builds like multi-motor robots, large sensor networks, advanced LED displays, and complex automation systems.
In short, the Arduino Mega gives you more room, more control, and more possibilities to bring your ideas to life. 🌟
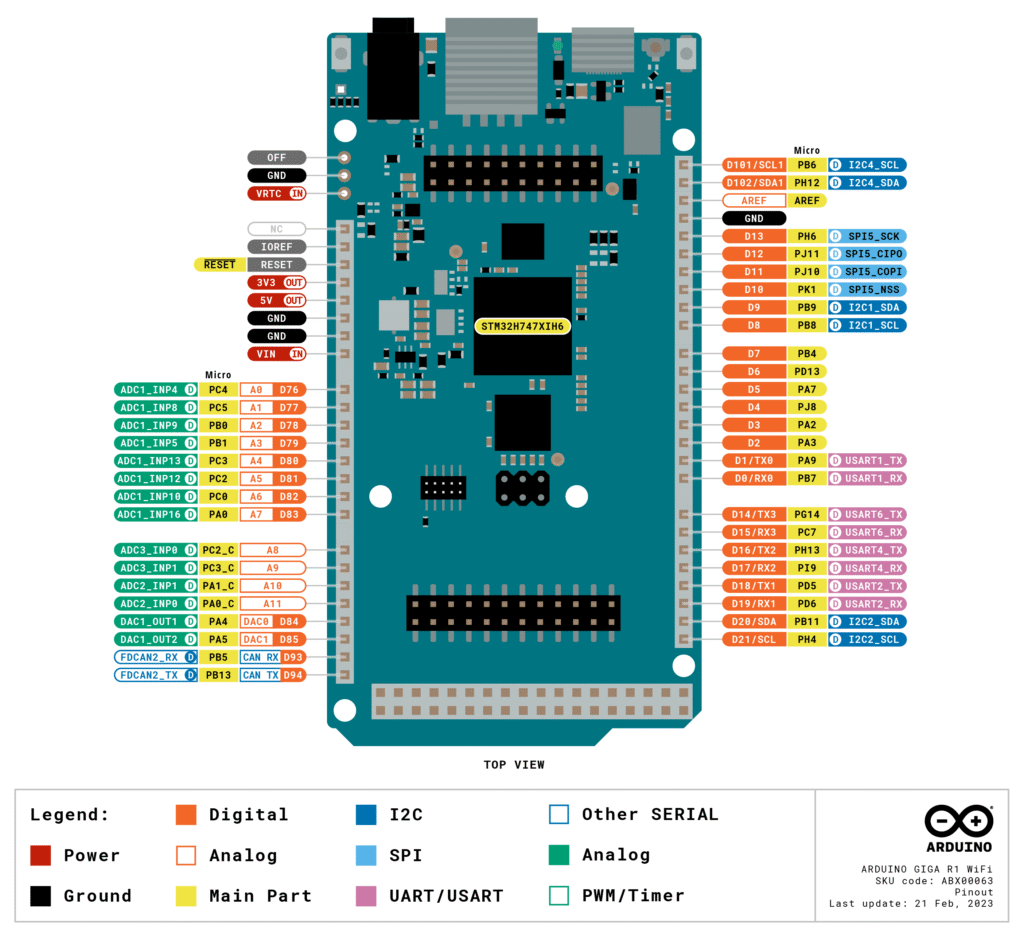
Here’s a clear, beginner-friendly Arduino Mega pinout table you can include in a blog or webpage. It’s structured for readability and highlights key functions:
| Pin Type | Pins | Notes / Functions |
|---|---|---|
| Digital I/O | 0–53 | Can be used as input or output; pins 0–1 are also Serial RX/TX |
| PWM (Digital) | 2–13, 44–46 | Supports analogWrite for PWM output |
| Analog Inputs | A0–A15 | Read analog sensors; can also be used as digital pins |
| UART / Serial | 0 (RX), 1 (TX), 14/15 (Serial1), 16/17 (Serial2), 18/19 (Serial3) | 4 hardware serial ports for communication with modules |
| I2C | SDA (20), SCL (21) | Connect I2C devices like LCDs or sensors |
| SPI | 50 (MISO), 51 (MOSI), 52 (SCK), 53 (SS) | SPI communication for modules like SD cards or displays |
| Power | VIN, 5V, 3.3V, GND | Supply voltage and ground pins |
| Reset | RESET | Resets the board programmatically |
| AREF | AREF | Reference voltage for analog inputs |
| Built-in LED | 13 | Can be used for simple testing and feedback |